USER GUIDE & SUPPORT
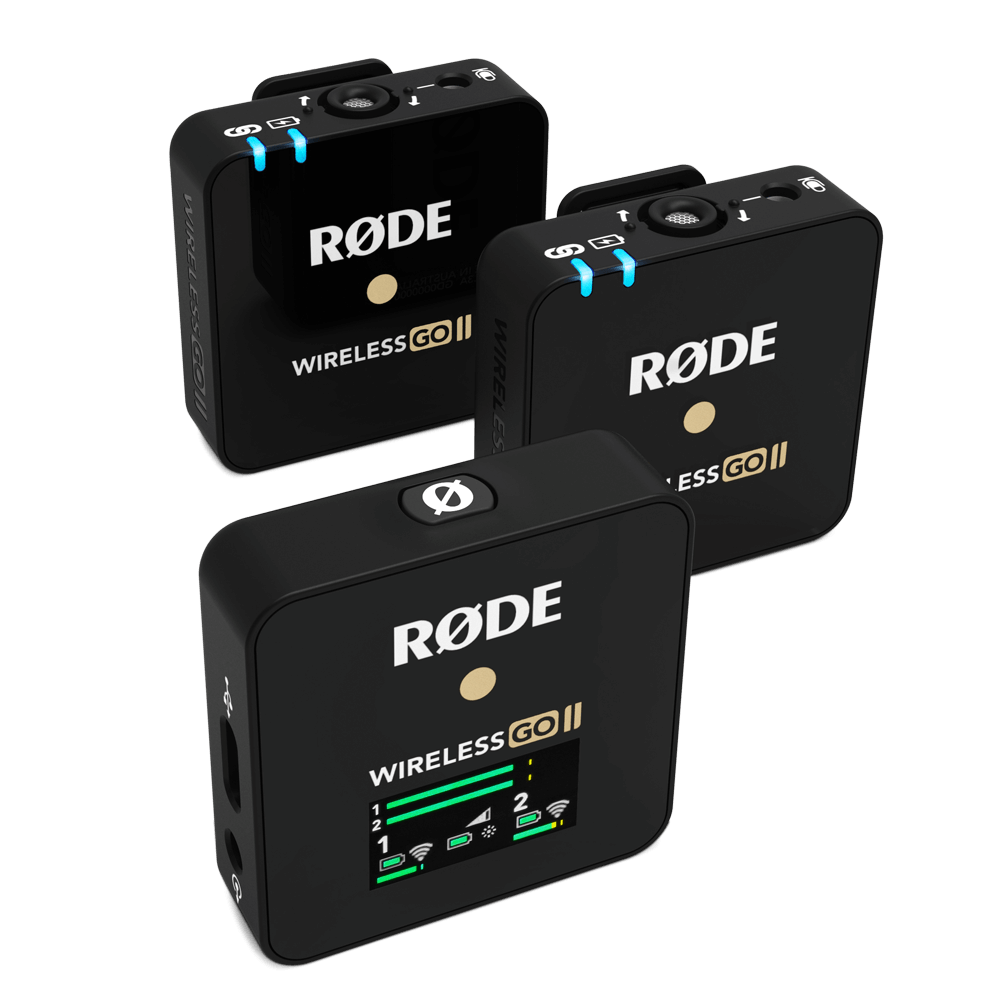
The Wireless GO II is a versatile and ultra-compact dual channel wireless microphone system consisting of a dual channel receiver and two transmitters.
Discover everything you need to know about using your Wireless GO II here.
WIRELESS GO II 简介
接收器
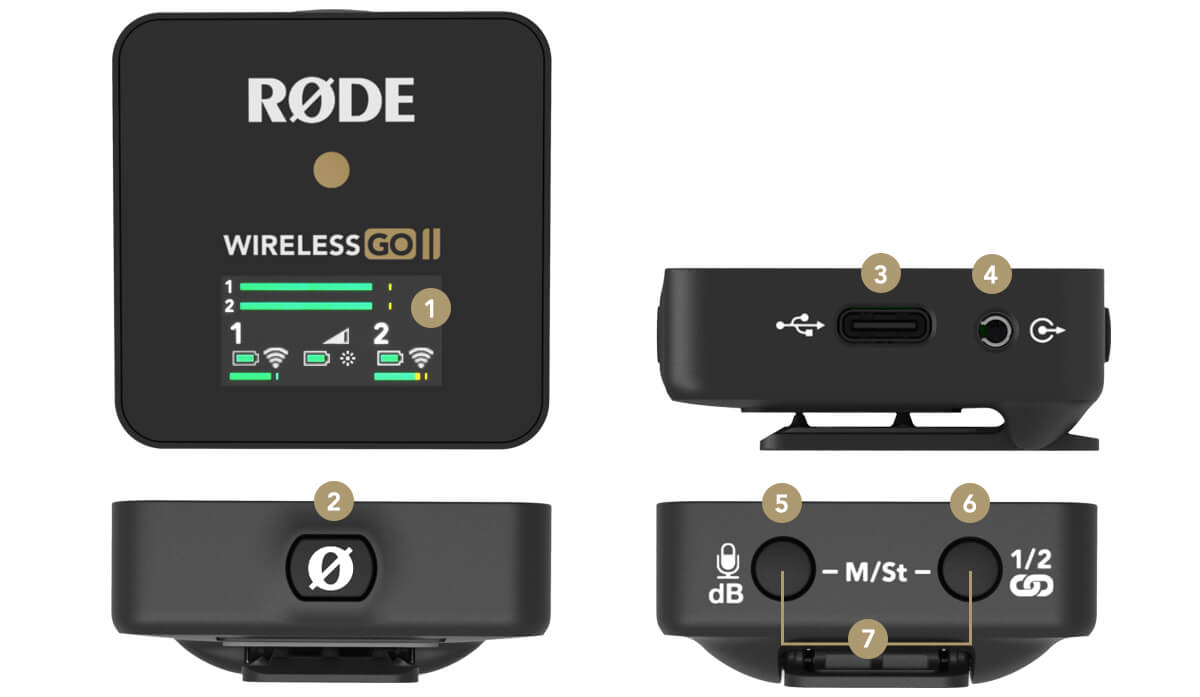
1LED 屏幕
2电源按钮
3USB-C 连接器
43.5 毫米 TRS 输出
5增益控制/静音按钮
6配对按钮
7分离/合并模式选择器
发射器
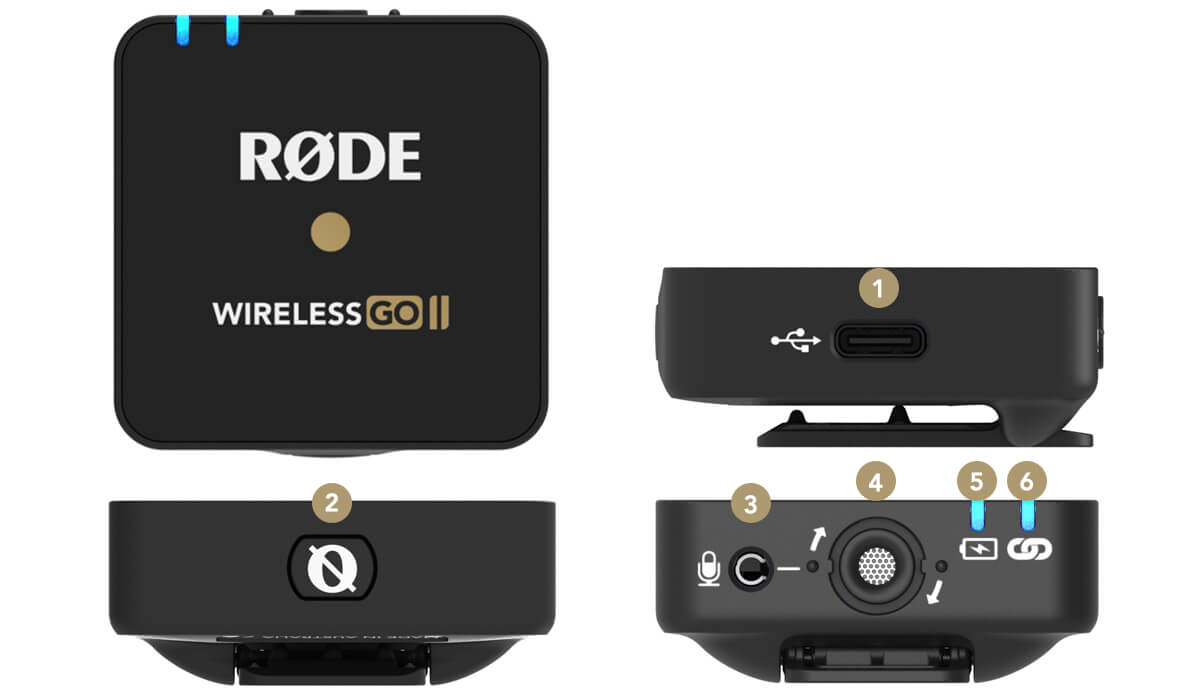
1USB-C 连接器
2电源按钮
33.5 毫米 TRS 输入
4内置话筒
5电池指示灯 LED
6连接性指示器 LED
双通道接收器
Wireless GO II 配有两个发射器和一个双通道接收器,您可以用它将两个发射器连接起来,从而将两个音源录制到一个设备中。开箱即用,发射器与接收器自动配对,并会记住它们被分配到的通道,所以您不必担心再次配对的问题。
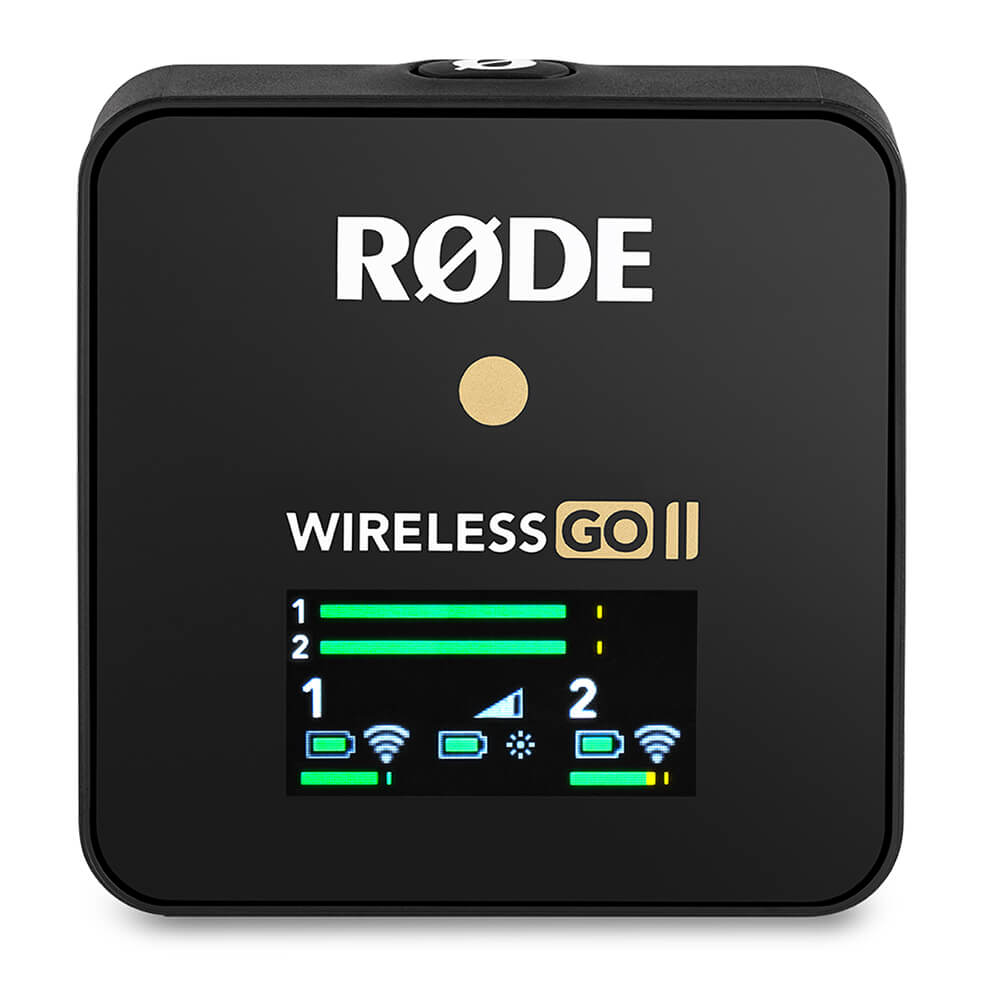
接收器的 LED 屏幕分为四个主要部分,屏幕的左右两边分别显示各发射器的电池剩余电量、信号强度和输入电平的图标,中间则显示接收器的电池剩余电量、背光模式和输出增益的图标。上面是接收器的输出电平表,可以方便地监测进入摄像机或录音设备的电平,确保信号不会太热。
开启和配对您的 Wireless GO II
要打开您的 Wireless GO II,只需按住接收器上的电源按钮即可。要将您的发射器与接收器配对,需每次按住发射器上的电源按钮。配对应该只需要几秒钟。
如果发射器与接收器失去连接,则发射器上的蓝色“∞” LED 会闪烁,而接收器上该通道的图标会变成空白,这样就很容易识别出需要重新连接的通道。
如果您需要重新连接发射器和接收器,或者您第一次使用不同的发射器,请按住接收器上的配对按钮“∞”三秒钟,启用配对模式,然后点按发射器上的电源按钮,等待几秒钟。
要断开发射器的连接,请点按配对按钮进行选择,然后按住配对按钮三秒钟。
了解 RØDE 的 IV 系列 2.4GHz 数字传输技术
Wireless GO II 采用 RØDE 全新的 IV 系列 2.4GHz 数字传输技术,采用 128 位加密技术。这可提供长达 200 米的传输范围(视线)。Wireless GO II 经过优化,可在射频活动频繁的环境中极其稳定地运行,包括密集的城市地区、购物中心、大学、会议中心和办公室,这样您就可以减少对掉线的担心,而更专注于您正在录制的内容。
合并模式和分离模式
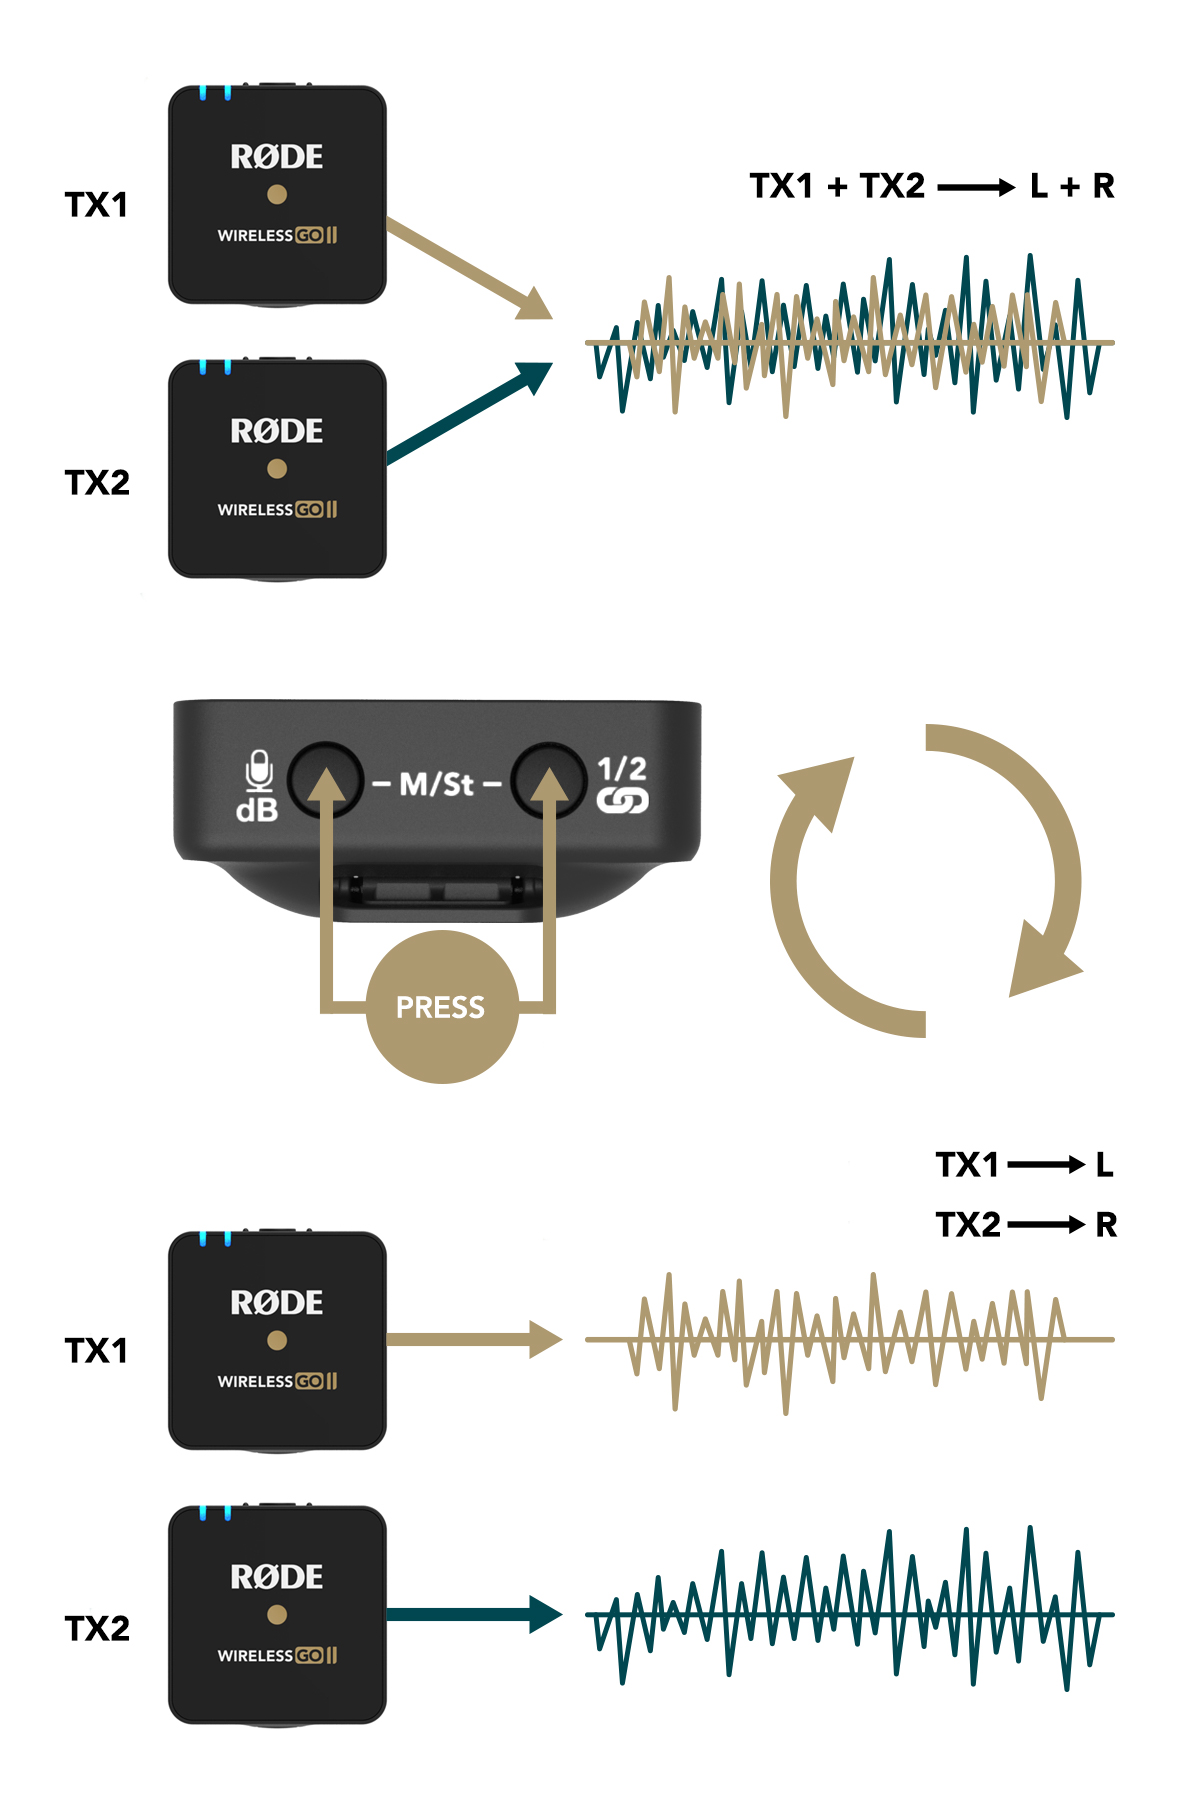
使用 Wireless GO II 录音,您可以选择“合并”模式或“分离”模式。这允许您将每个发射器的声音分别录制到不同的输出通道上,或将两个发射器的声音合并为一个输出。
要在“合并”模式和“分离”模式之间切换,请同时按住接收器上的两个按钮三秒钟,并注意 LED 屏幕上显示的输出电平表。
如果显示两个电平表,表示处于“分离”模式。这意味着每个发射器的输出正在被分别录制到 Wireless GO II 输出的不同通道(左和右)上,这样在后期制作时就可以单独处理两个通道的输出音频。这很适合双人采访,在这样的应用场景中,您需要能单独编辑和混合每个音源。Split' mode
如果只显示一个电平表,表示处于“合并”模式。这意味着两台发射器的声音信号合并成一个单一的加和输出。如果您只使用一个发射器,但希望将音频同时录制到录音设备的两个通道上,或者如果您要使用安全通道(详见下文),这种模式会是很好的选择。如果是在现场演示设置中使用 Wireless GO II,这种模式的效果也会很好。
关于如何在后期制作中导入和分离音频的更多说明,请查看博客文章《如何将两个话筒的声音录入摄像机》。
通道选择和静音控制
通道选择
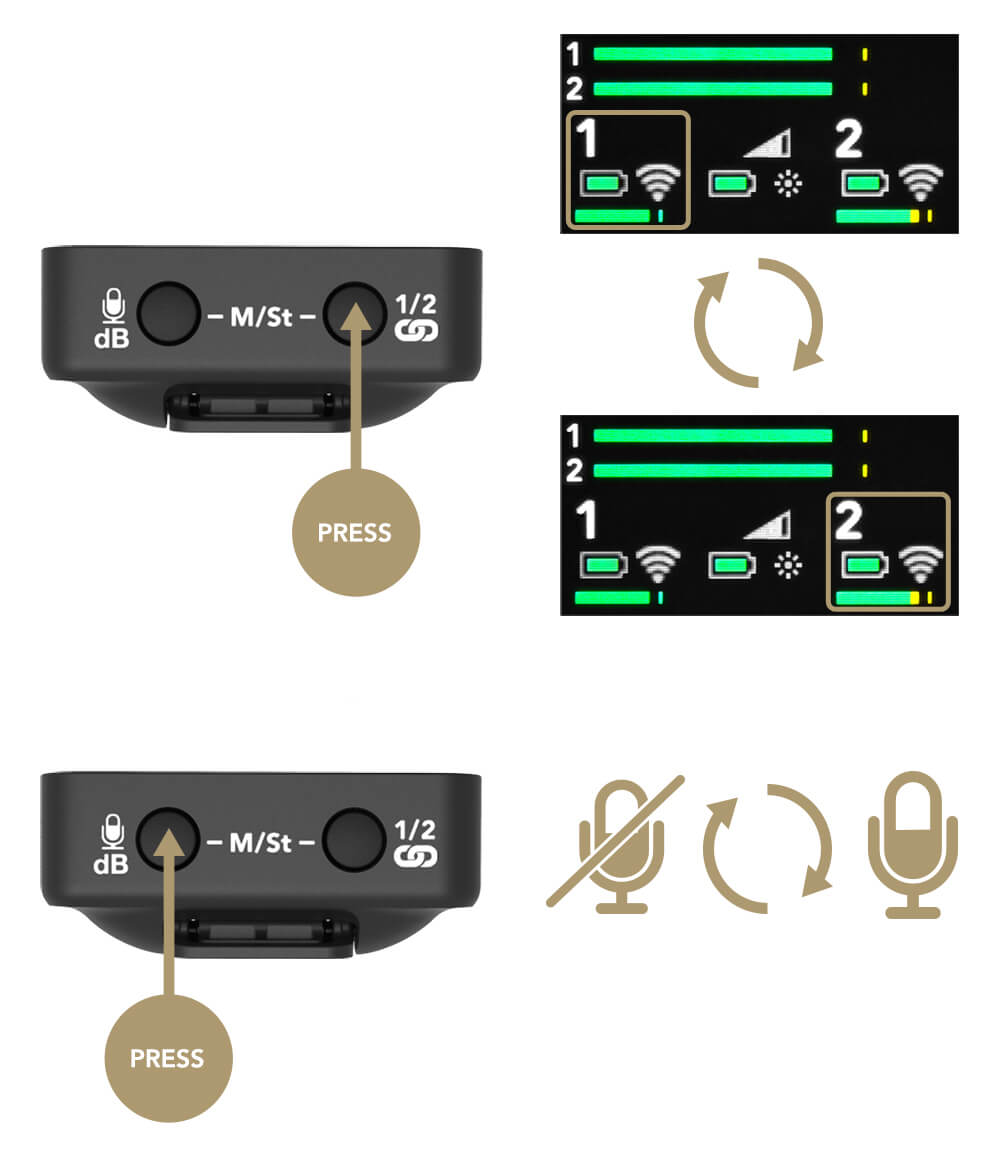
如前所述,点击接收器上的配对按钮,即可在两个发射器之间循环。点击一下就会选择发射器 1,第二次点击就会选择发射器 2,第三次点击就会退出通道选择。请注意,这只有在两个发射器都打开并与接收器配对时才会生效。这可以让您连接和断开发射器,也可以让它们静音。
通过接收器进行静音控制
一旦通过“通道选择”选中了所需的发射器,单击增益控制/静音按钮即可使其静音。这有助于摄像机操作员需要快速将其中一个发射器静音的情况。
通过发射器进行静音控制
您也可以通过发射器进行静音。与接收器配对后,只需单击发射器电源按钮即可静音和取消静音。这有助于演讲者或主持人想让自己静音的情况。
设备连接选项
Connecting to Cameras
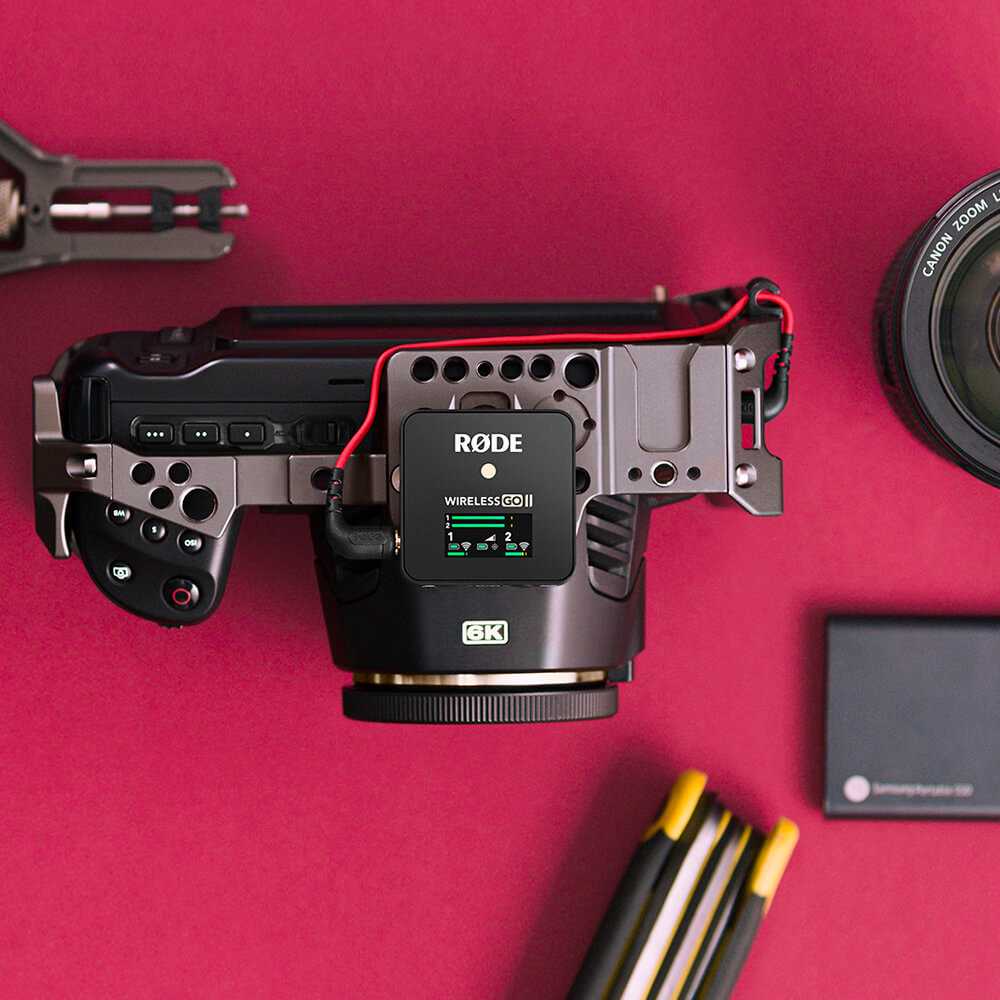
使用 SC5 线缆将 Wireless GO II 连接到具有 3.5 毫米 TRS 输入的摄像机和其它设备。如果您需要将话筒连接到具有 XLR 输入的设备上,请使用 VXLR Pro 等适配器。
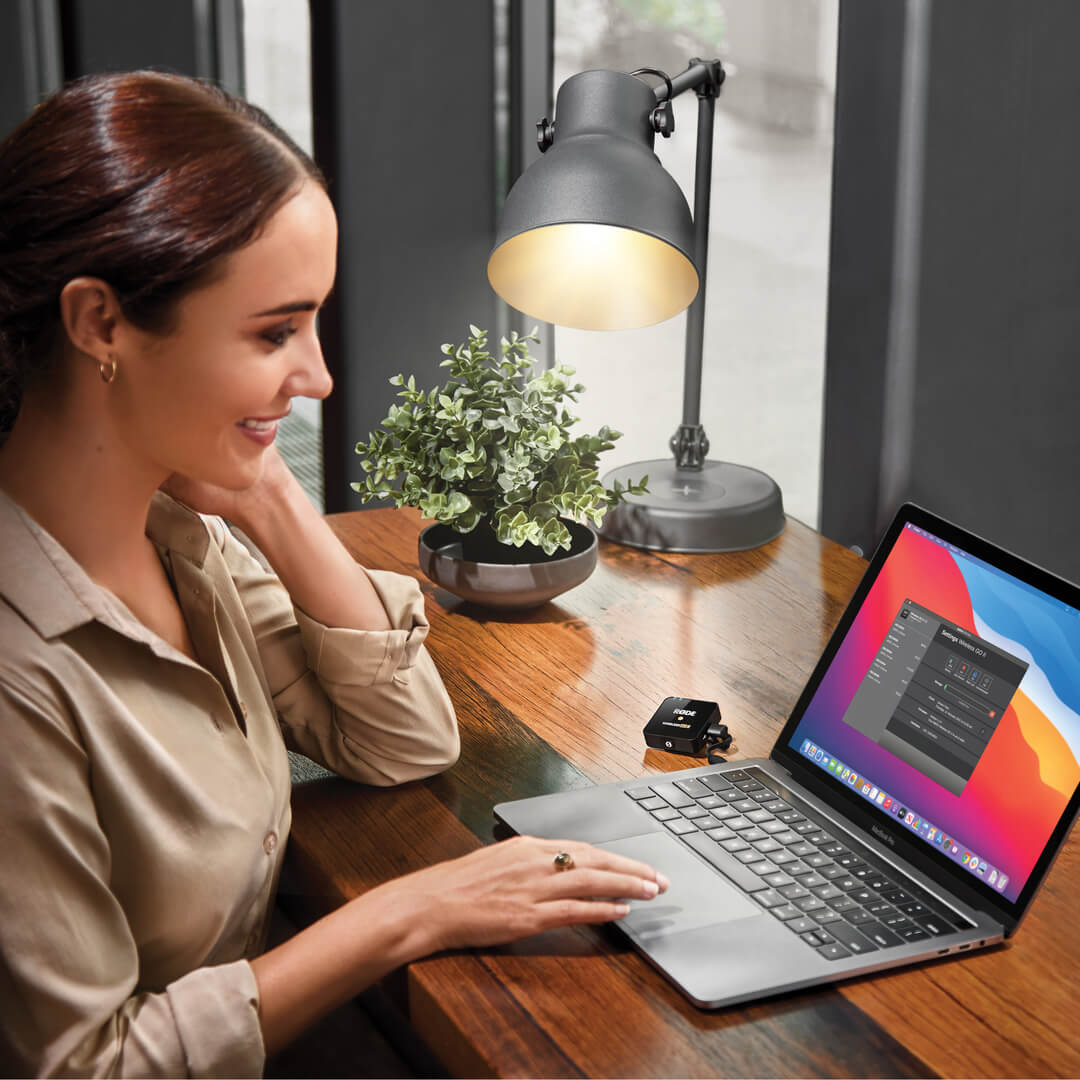
Connecting to Computers
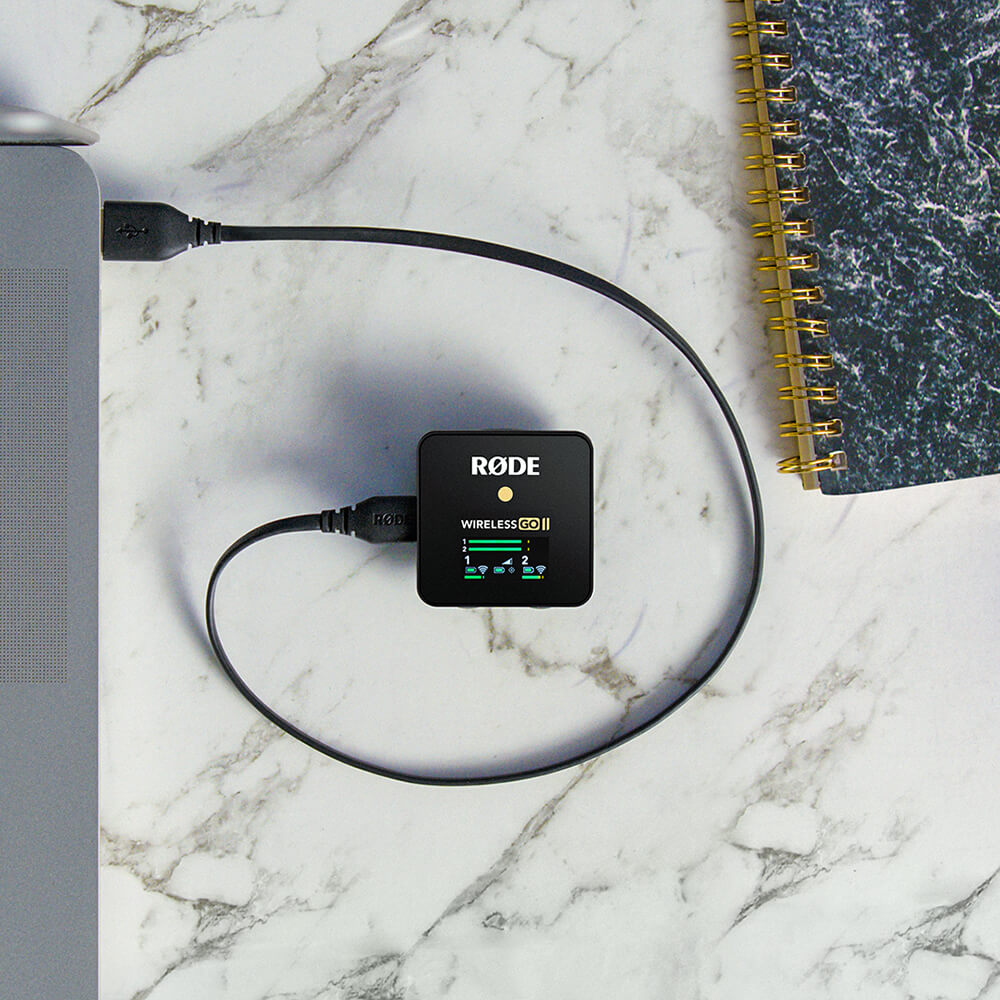
使用随机提供的 USB-C 转 USB-A 线缆将 Wireless GO II 接收器连接到任何一台电脑,然后进入音频设置,选择“Wireless GO II RX”作为输入设备。这其实是将 Wireless GO II 接收器变成了一个无线 USB 音频接口。
Connecting to Mobile Devices
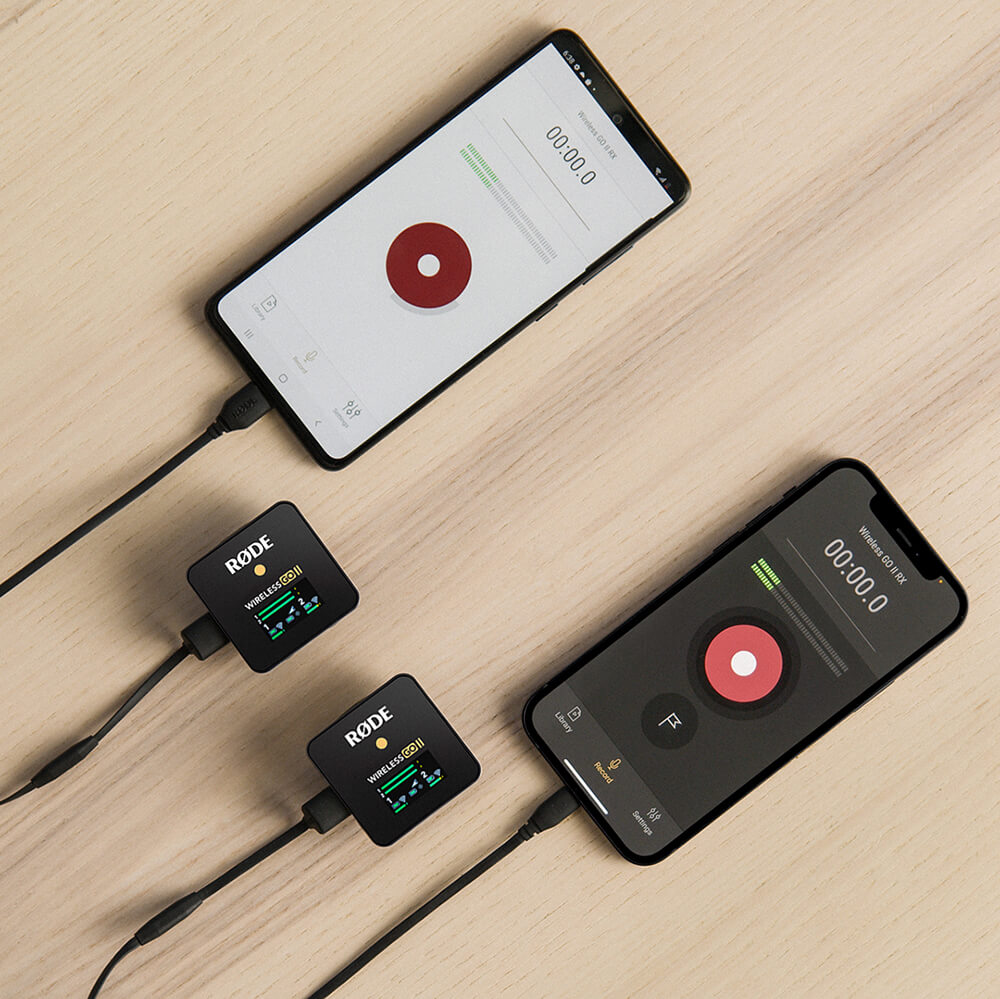
要将 Wireless GO II 连接到智能手机或平板电脑,您将需要额外的线缆。对于带有闪电输入的 iOS 设备,请使用 SC15 USB-C 转闪电转接线。Wireless GO II 通过了 MFi 认证,这意味着它将与所有 iOS 设备无缝交互。对于 Android 和其它具有 USB-C 输入的设备,请使用 SC16 USB-C 转 USB-C 线缆。
专业提示
将 Wireless GO II 连接到您的智能手机或平板电脑是通过 USB-C ,而不是使用 3.5 毫米模拟 TRS 输出,这样您就可以使用许多有用的功能:
高品质的音频输出——使用 USB-C 输出可利用 Wireless GO II 的高品质内部 A/D 音频转换器,绕过您的设备中音质相对较差的电路,从而获得卓越的音效。
耳机监听——使用 USB-C 输出可以释放 3.5 毫米输出,这样您就可以在录音时插入耳机监听音频。您甚至可以使用增益控制来调节耳机的音量。
访问安全通道——使用智能手机时,Wireless GO II 的安全通道只能通过 USB-C 输出访问(有关安全通道的更多信息,请参阅下文)。
Connecting to the RØDECaster Series
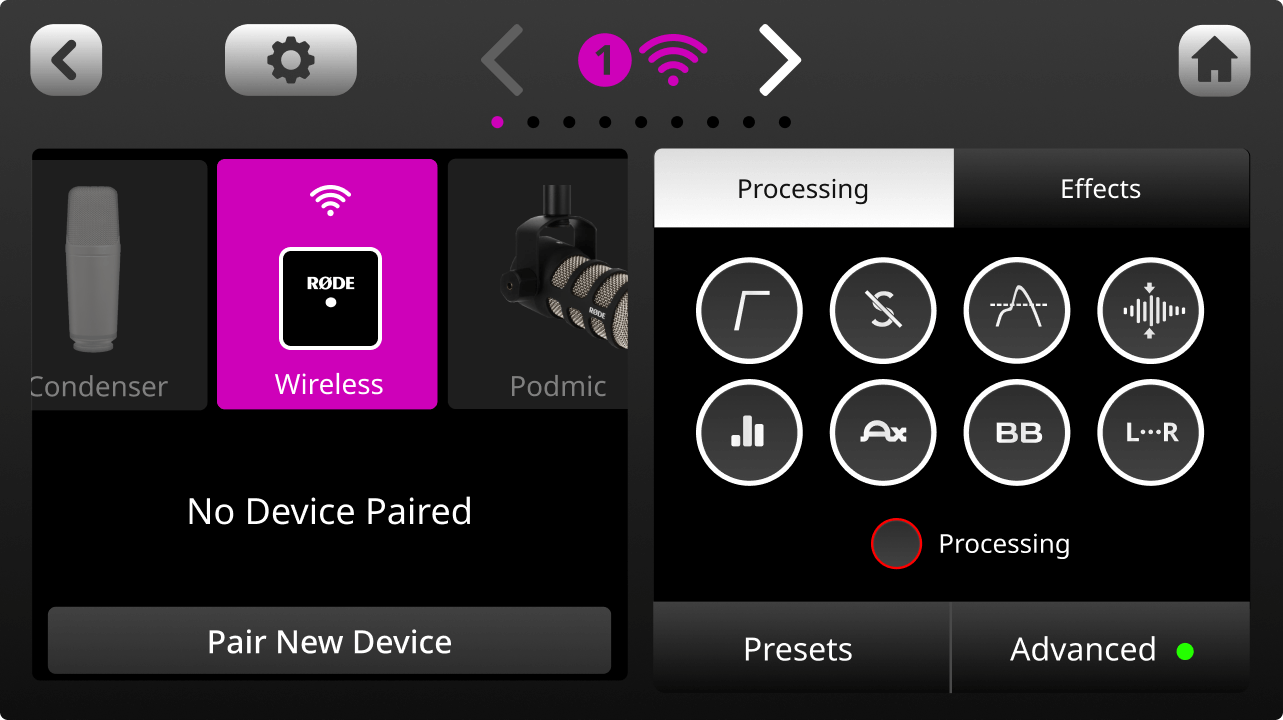
You can pair up to two Wireless GO II transmitters to the RØDECaster Pro II or RØDECaster Duo and they will be treated like any other input channel, meaning that you can record, mix and apply the APHEX ® processing, effects to your wireless audio. To pair a Wireless GO II transmitter to your RØDECaster Pro II or Duo, access the channel set-up screen by pressing the physical button above the fader you wish to assign your wireless device to. On this screen, you will see a list of microphone, instrument and other input options that you can scroll through. Scroll to the left to select the ‘Wireless’ option, tap ‘Pair New Device’ to enter pairing mode, power on your Wireless GO II transmitter and short-press its power button (ensuring that the transmitter isn’t already connected to another receiver). Your device’s connectivity, recording, mute and battery status status will be displayed on this screen.
Note: Assigning any of the four input channels to the ‘Wireless’ option will override the associated physical XLR/TRS input, meaning that you won’t hear any audio coming from microphones or instruments plugged into that channel.
Gain Control
The Wireless GO II has flexible gain controls that allow you to precisely tailor the receiver’s output to avoid clipping or distortion in your recording device.
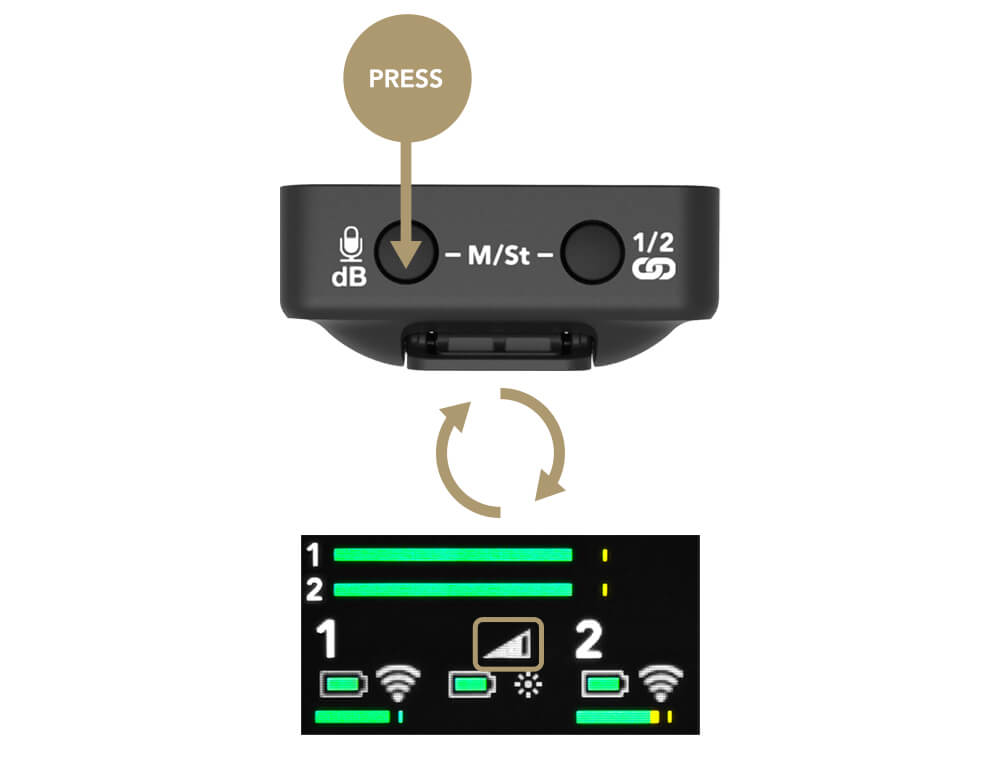
The gain control is found on the receiver. This is a three-stage pad that cuts your output level in 12dB increments. A single click of the gain control button will allow you to select between high (0dB), medium (-12dB), and low (-24dB) gain settings. The level icon in the middle of the screen indicates which gain setting is selected. An additional fine gain control mode can also be enabled in the RØDE Central app. See below for more information.
Note that the gain control only affects the 3.5mm output of the Wireless GO II, not the digital USB-C output. If you are using the Wireless GO II with a smartphone or computer and need to adjust your gain, do so in your recording software or app.
It’s also possible to have more granular control over the gain level, as well as to select a gain preset based on a wide variety of popular camera manufacturers and models. For more information, view the Fine Gain Control section of this user guide.
专业提示
为了在录制时获得尽可能无干扰的信号,建议将摄像机的增益设置得越低越好,然后根据需要使用 Wireless GO II 上的增益控制来增强信号。摄像机的前置放大器通常都品质差、噪音大,而且相当灵敏,所以最好不要依赖摄像机来实现良好的录音水平。
Battery Life and Power Saver Mode
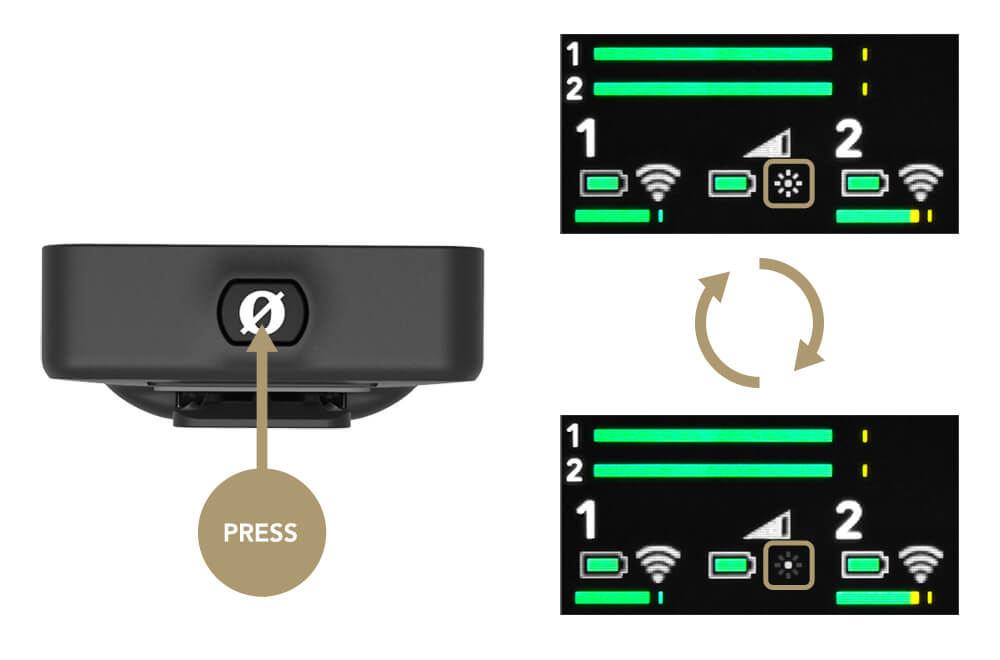
Backlight Control/Power Saver Mode
To conserve battery life, you can activate power saver mode on the receiver. When enabled, this will turn the LED backlight off after 10 seconds of inactivity.
To turn power saver mode off, single-click the power button. The backlight will now always stay on. The small sun icon indicates if power saver mode is engaged or not (full = disengaged).
Battery and Charging
The Wireless GO II’s transmitters and receiver each have an in-built lithium-ion battery that can last up to seven hours. When the battery is low on a transmitter, the battery LED will start flashing. When it is very low, it will flash faster.
There are also battery level icons for each unit on the receiver screen. When the battery is fully charged, it will display a green outline. When the battery level is very low, it will turn red. The Wireless GO II can be recharged using the supplied USB cables. When charging, the battery LED on the transmitters will flash and the battery level icon on the receiver will display a lightning bolt. You can still use the Wireless GO II while it's charging.
使用防风罩
每台发射器都配有一个高品质的内置全指向电容音头。这是一种非常灵敏的话筒,它被设计用来收集来自四面八方的非常细微的声音。
在户外或多风的环境中录音时,建议使用随附的毛茸防风罩,以帮助保护音头,减少录音中的风声或背景噪音。
Wireless GO II 配有三个毛茸防风罩。这些都经过了彻底的重新设计,以确保连接极为稳固,即使频繁使用,也不会从发射器上掉下来。
为了将它们牢固地连接在一起,请将防风罩上的两个白色圆点与接收器上的黑色圆点对齐,然后将防风罩向下推,拧一下锁在合适的位置。反向操作该过程即可移除。

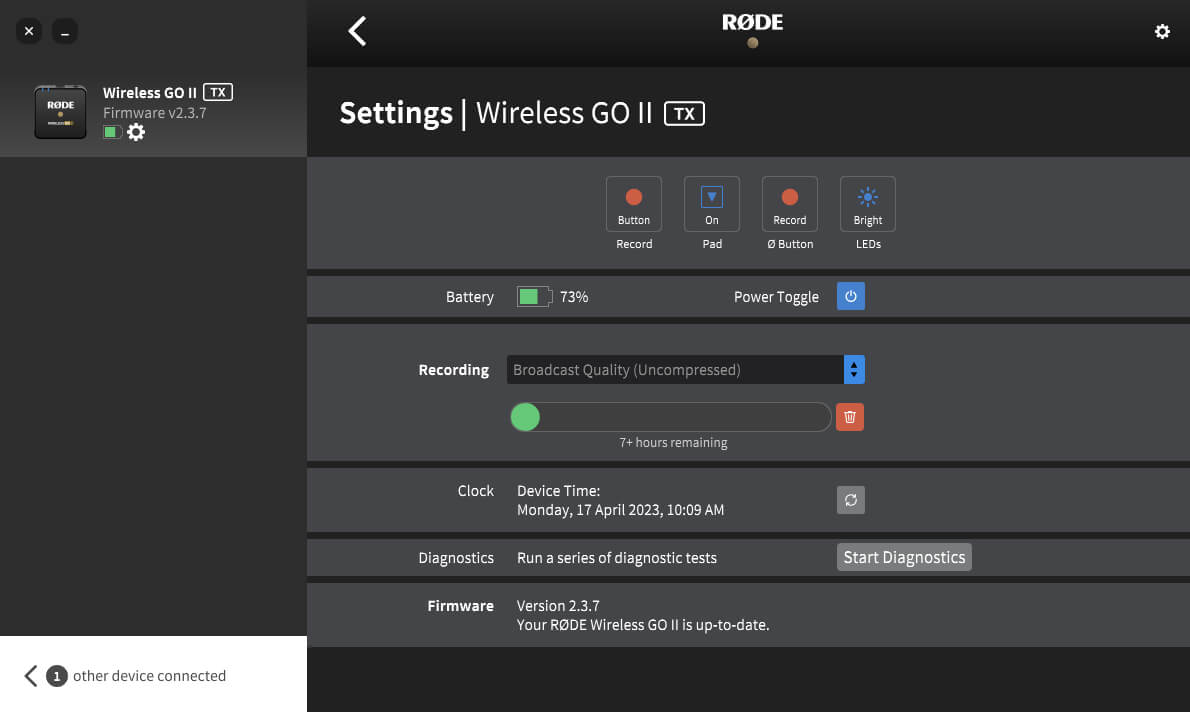
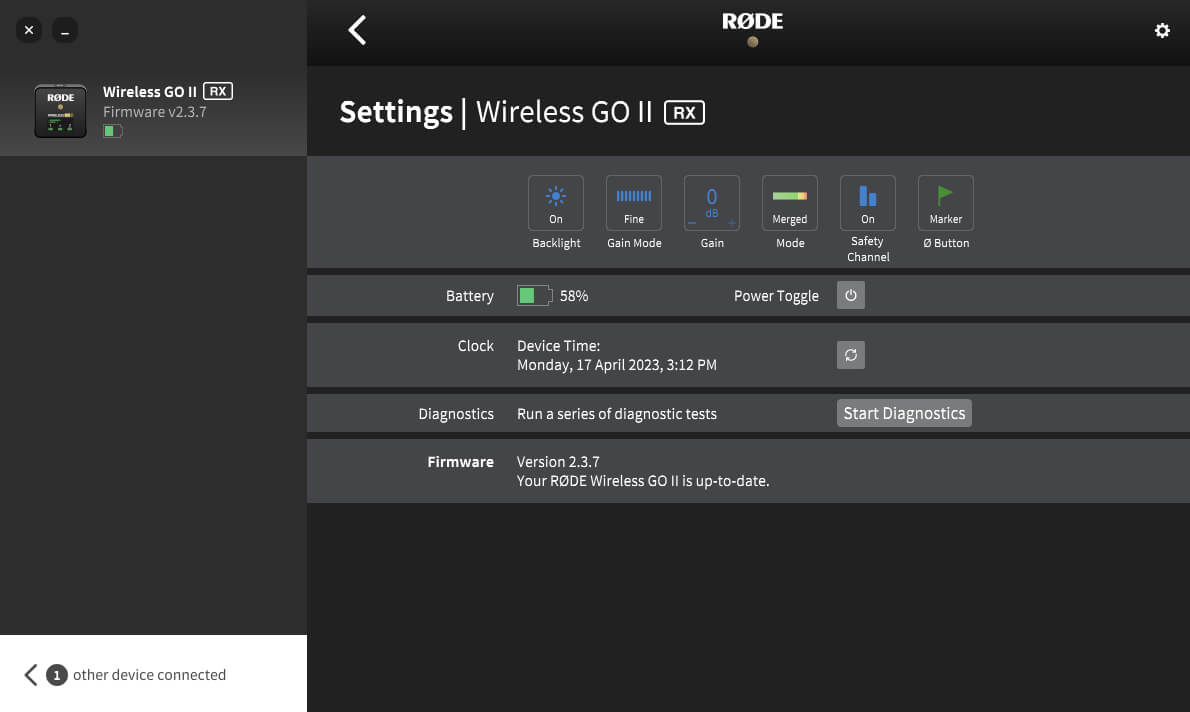
RØDE Central
RØDE Central is an easy-to-use desktop and mobile companion app for the Wireless GO II that allows for complete device configuration anywhere, including:
- Configuring the on-board recording function
- Unlocking advanced features, including the safety channel, fine gain control and more
- Changing the Ø button function
- Manually powering on and off your units
- Running a diagnostic test on battery life, bugs and firmware version
It also allows you to optimise and export the on-board recordings (desktop only), update to the latest firmware (desktop only), and access device information.
Download it for free to unlock the full potential of your Wireless GO II.
Note: OS Requirements – MacOS 10.15 or later; Windows 10 Version 1803 or later; iOS 14 or later; Android 9.0 or later.
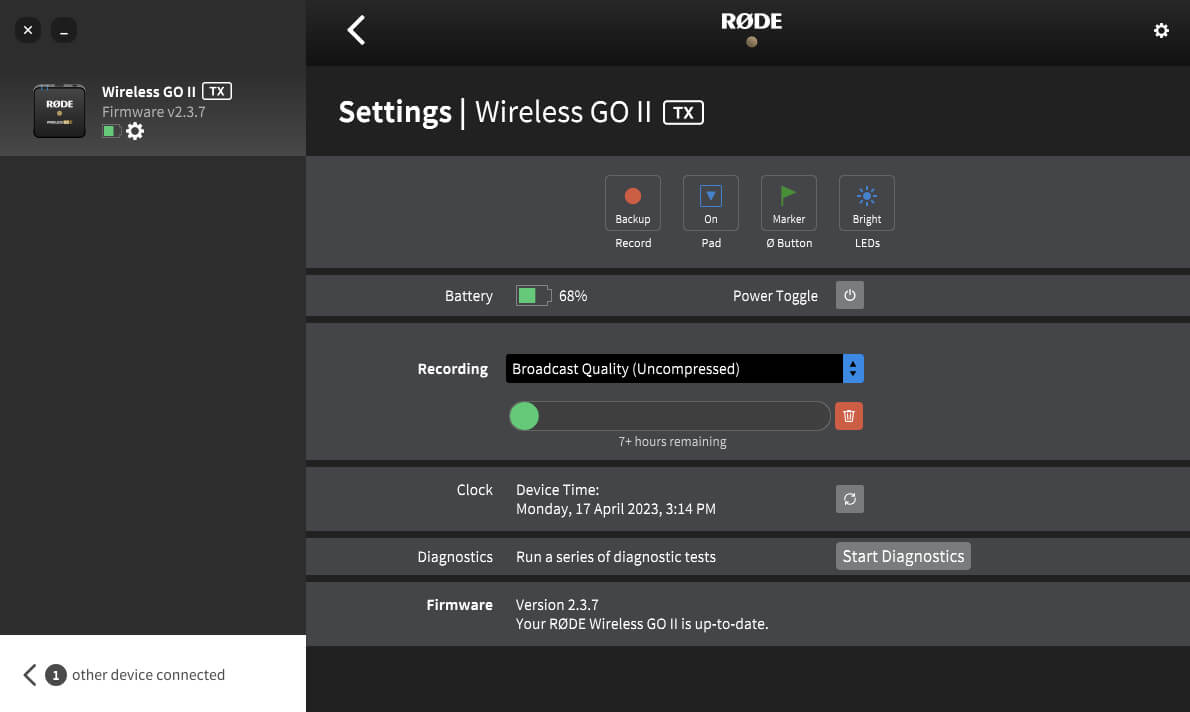
Using the On-Board Recording Function
Each of the Wireless GO II’s transmitters has an on-board recording function, with internal memory capable of storing over 40 hours of compressed audio or seven hours of uncompressed audio.
This feature can be activated via RØDE Central via the ‘Record’ setting. When activated, a red 'REC' recording icon will appear above the channel that the transmitter is connected to on the receiver.
Configuring the Recording Mode
There are four different on-board recording modes to choose from. These can be selected via RØDE Central:
'Always' recording mode: When this mode is activated, the transmitter will start recording audio as soon as it is switched on. It will continue recording until it is switched off, regardless of whether it is connected to the receiver. This means that you will have a continuous recording from the moment the transmitter is switched on, making this mode suitable for using the Wireless GO II as a standalone field recorder. Note that in this mode, the ‘mute’ function will not affect the on-board recording (although it will still mute the wireless transmission). When this is activated, audio can only be recorded in uncompressed format (see below for more info on this).
'Backup' recording mode: When this mode is activated, the transmitter will start recording audio when it connects to the receiver. When the receiver is switched off, the recording will stop. This means that if the signal drops out at any time or if you forget to hit record on your device, you will still have a backup recording for the period that the wireless connection was active.
‘Button’ mode: When this mode is activated, you can manually start and stop your recording by pressing the ‘Ø Button’ on your transmitter. When triggering a recording using the button, the transmitter’s LEDs will cycle from dim > medium > strong and then flash every 5 seconds while recording. Stopping recording will cycle the LEDs from strong > medium > dim. Each time you end a recording, a new recording will be made when you next click the button. To activate this mode, configure the ‘Ø Button’ setting for your transmitter to ‘Record’ – this automatically enables ‘Button’ mode recording. When this is activated, audio can only be recorded in uncompressed format (see below for more info on this).
'Off': Switching off the recording function means the transmitter will not record any audio internally. Existing recordings will remain on the unit until manually deleted using RØDE Central.
Accessing, Optimising and Exporting Your Recordings
RØDE Central allows you to access, listen back to, optimise and export all internal recordings from within the software (desktop version only).
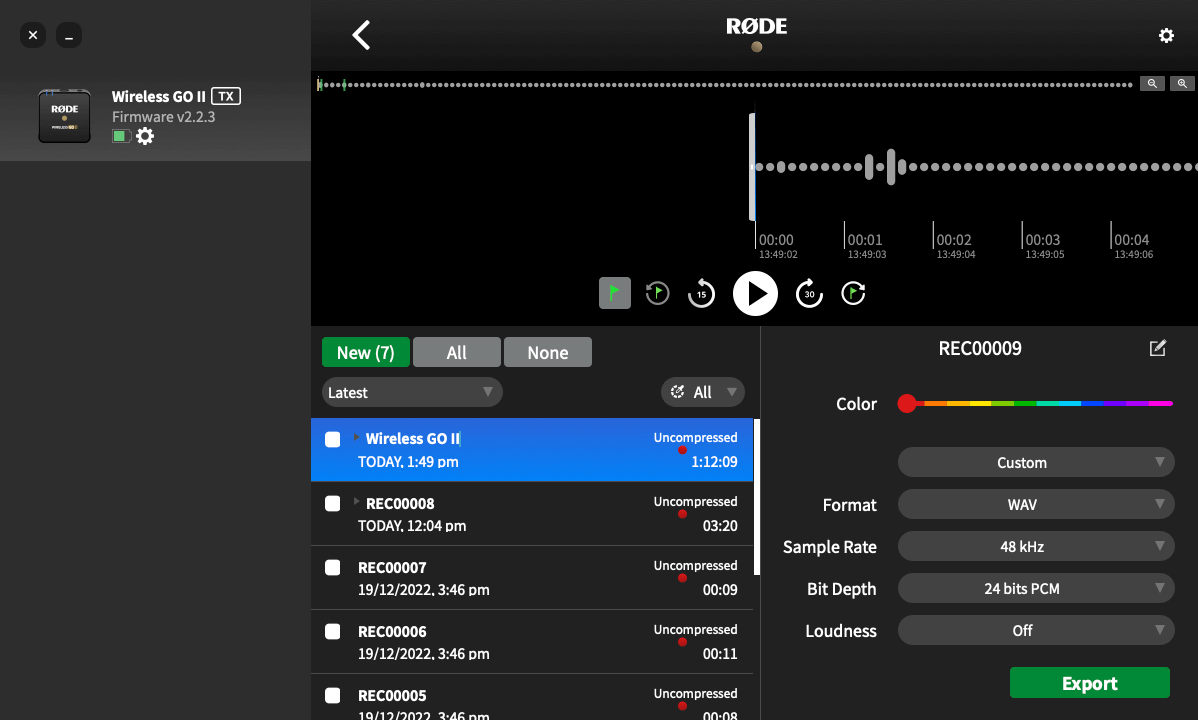
To access your recordings, open RØDE Central, plug in your transmitter(s) and select one from the list of devices. Your recordings will be listed chronologically in the left-hand column from newest to oldest, with the recording time, date, length, and file type displayed.
Click on a recording to get started. A waveform will be displayed with real-time and elapsed recording time on the horizontal axis. This allows you to scrub to the desired time easily. You will also find zoom in/out buttons to adjust your view of the waveform.
There is also a mini-nav bar above the master waveform, which shows all the waveform data as well as any dropouts and user markers in the file (see below for more information on markers). This allows you to quickly jump to a region rather than having to scrub through the whole file, which is particularly handy for longer recordings.
Direct WAV Export
If you record in ‘Uncompressed’ mode, you can also access your recordings as WAV files when you’ve connected your Wireless GO II transmitter to your computer, just as you would any other mass storage device or hard drive. The transmitter will show up as a drive on your computer when plugged in via USB – here, you can copy your recordings across to your computer if you need to quickly offload them.
Note: If you want to view any placed markers in your audio files, you’ll need to also copy across the WAV file’s corresponding EGG file and later import them into Central to view the markers (see ‘Importing Files’ section below for more details).
Nested Recordings
If a recording runs over 30 minutes, or if it includes any manually placed markers (see below), it will have a dropdown arrow beside the filename. Clicking this arrow shows you each 30-minute segment as its own ‘chapter’ and also displays any markers you’ve manually placed in your recording, allowing you to quickly navigate to, and select sections of your larger file.
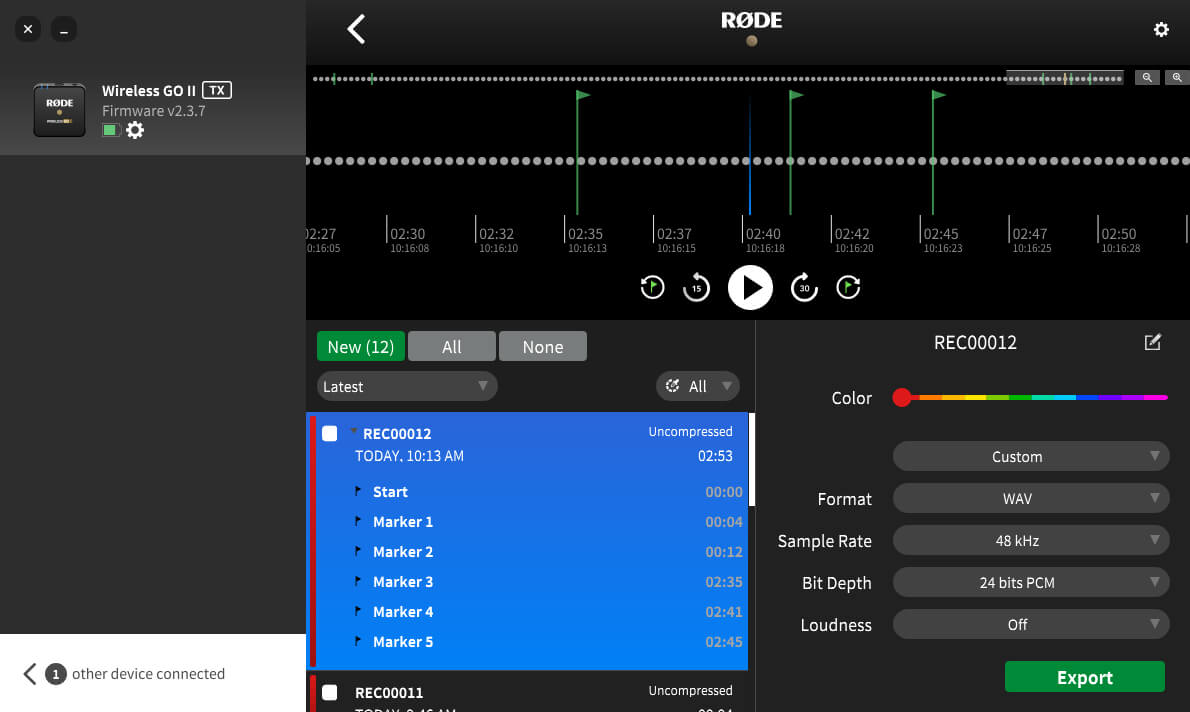
Marker Drops
The waveform will display any marker drops in the recording. These signify dropouts (red markers), dropout regions (red sections) and user markers that you have manually dropped (green markers). This is useful for pinpointing exactly what section of audio you need to export.
- Dropouts: If the quality of the wireless signal between a transmitter and the receiver falls below the acceptable range during recording, a marker will be automatically dropped into the internal recording to signify a signal dropout. These are displayed as red flags.
- Dropout Regions: If several dropouts occur within 10 seconds of each other, this will be displayed as a dropout region rather than multiple marker lines clumped together.
- User Markers: You can manually drop a marker in your recording at any time via the receiver or transmitters. This feature can be enabled in RØDE Central by toggling the power ('Ø’) button mode to 'Marker' (see below). User markers are displayed as green flags in RØDE Central. In addition to appearing in the waveform, user markers are indexed in a drop-down menu under each recording. Click a marker to jump to that section of the recording.
- 'Jump-to Marker' Buttons: Navigating to markers in a recording is easy using the ‘Jump-to Marker’ buttons, which are located next to the play button under the waveform. Simply select what type of marker you want to navigate to (dropouts or user markers), then click the buttons to jump to those markers.
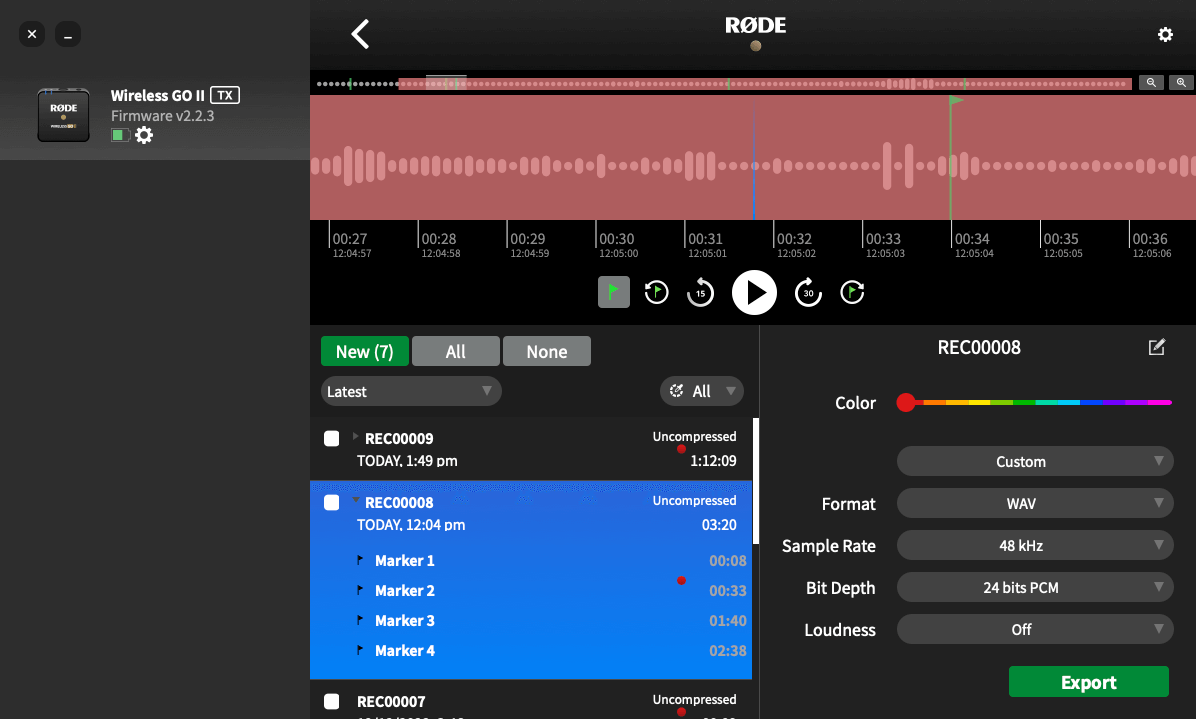
Optimising and Exporting Your Recordings
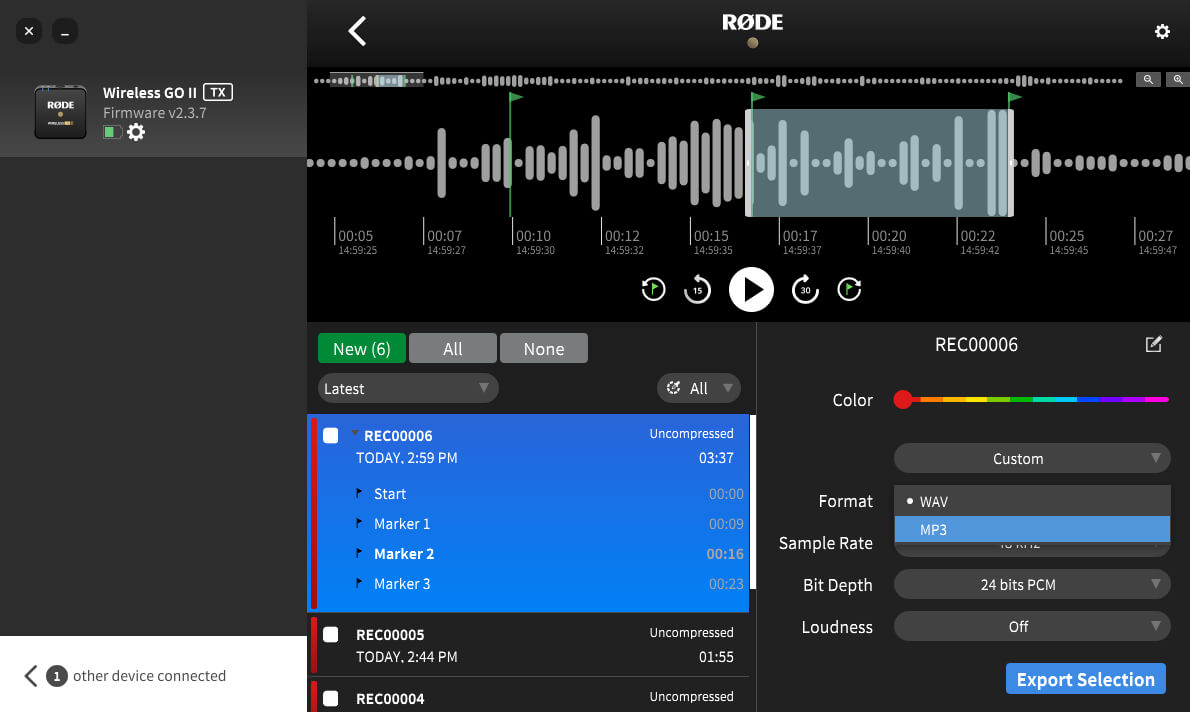
When a recording is selected in RØDE Central, an ‘Export’ button will appear. Clicking the 'Export' button will give you access to a drop-down menu of export options for optimising your audio, including:
- File name
- File type (WAV/MP3)
- Bit rate
- Sample rate
Find out more about the optimisation and export options that RØDE Central offers.
Batch Export and Export Selection
In addition to being able to export individual recordings, you can export multiple files simultaneously by checking the box next to any recording and clicking ‘Export Selection.’
You can also export a specific section of a recording by right-clicking and dragging the selection tool anywhere on the waveform to highlight the region you need, then clicking ‘Export Selection’. You can also do this in the mini-nav bar.
Deleting Your Recordings
When storage in the transmitter is full, new recordings will begin overwriting the oldest recordings. After a recording session, it’s a good idea to export all of your audio then delete the files from the Wireless GO II to ensure you don’t lose any audio you haven’t saved.
Clicking the transmitter settings cog in RØDE Central will allow you to see how much storage space you have left and mass delete all recordings on the transmitter.
Importing Files
When a Wireless GO II transmitter is plugged into a computer, you can access the on-board files as you would any other external storage device (such as a hard drive). If you recorded in uncompressed quality, you can simply copy the WAV files to your computer, however if you recorded in compressed quality, the files will be in a different format (UGG) and won’t be playable until they’re exported via RØDE Central. However, if you want to quickly offload your files, you can copy them onto your computer and import them into RØDE Central at a later stage in order to manage, select and export your audio into the format you wish, without the transmitter connected.
To do so, create a new folder on your computer and select both the EGG and UGG/WAV files corresponding to the recording(s) you wish to import later, copying them from your transmitter to your new folder. For instance, copy both “PEA00008.EGG” and “REC00008.UGG” if you wish to import “REC0008” later on.
To import these files, open RØDE Central (desktop), click the settings cog in the top right corner, click the ‘Local Recordings’ dropdown and select the folder that contains your EGG and UGG/WAV files. You’ll see a ‘Local Recordings’ device show up on the left, and clicking on this allows you to manage, trim and export any recordings in the same way you would if it was a transmitter.

Naming Recordings
You can rename your recordings in RØDE Central. Simply double-click a recording title to rename it and press ‘Enter’/’Return’ to confirm. This file name will be retained after being exported, making them easier to manage. This also provides a clear indication of which recordings are new each time you connect a transmitter (as these will be unnamed).
Note: Recording file names are stored in RØDE Central, not on the transmitters, meaning that if you plug your Wireless GO II into a different computer, saved file names will not appear.
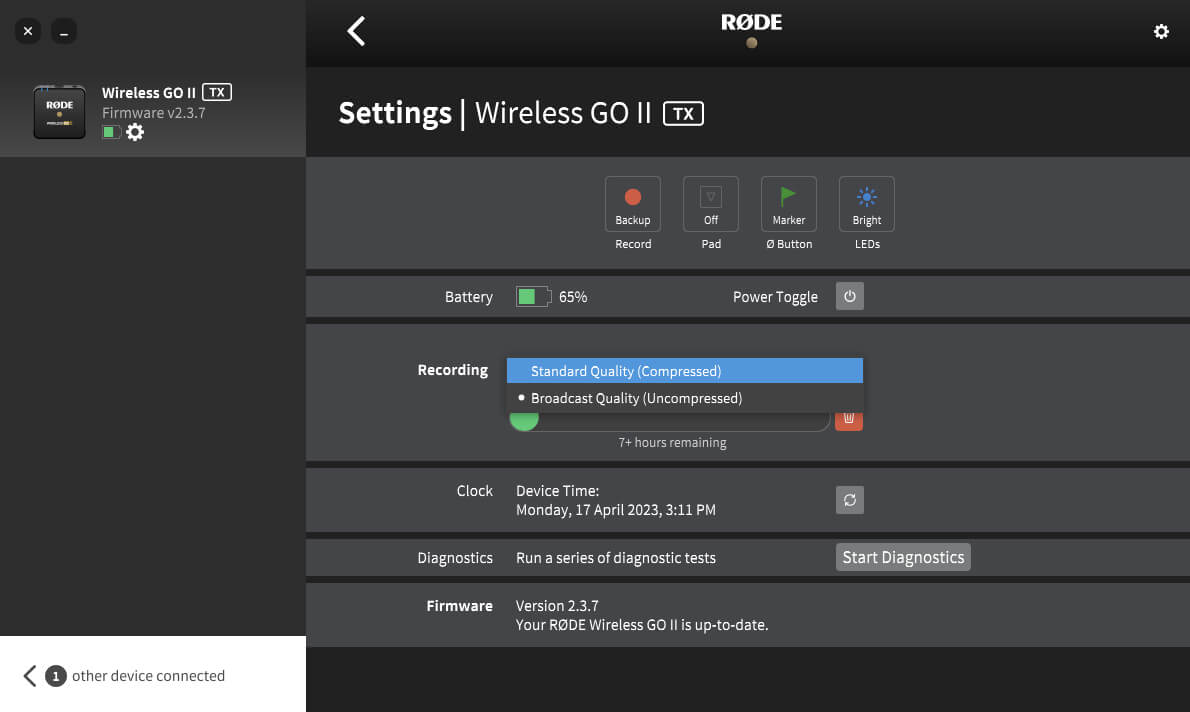
Compressed and Uncompressed Audio
When using the on-board recording function, RØDE Central gives you the option to configure the format of the audio file. Note that the ‘Always' and ‘Button’ recording modes will record in the uncompressed file format to ensure you have the highest quality audio available.
Compressed recording: In this mode, the Wireless GO II transmitter records audio in a compressed format. Each transmitter can store over 40 hours of compressed audio. Note this is higher than the 24+ hours stated when the Wireless GO II was launched – our engineers have been able to optimise the storage capability through firmware updates (ensure you have the latest firmware version installed via RØDE Central). This setting is only available when ‘Backup Recording' mode is selected.
Uncompressed recording: In this mode, the Wireless GO II transmitter unit records in uncompressed WAV format, and currently utilises a 48KHz, 24-bit audio stream. In this mode, the unit can store around seven hours of audio. This is the only mode available when using the ‘Always' and ‘Button’ recording modes. If you record in this format, your audio files are accessible as WAV files when plugging your transmitter into a computer, just as you would use any other USB drive or hard drive.
Safety Channel
RØDE Central allows you to activate the Wireless GO II’s safety channel. This is a handy feature that is also found on the VideoMic NTG and VideoMic Pro+.
The safety channel can only be activated in 'Merged' recording mode (when the transmitter channels are being combined into a single summed output). These recordings contain two channels of identical audio. However, enabling the safety channel will reduce the volume of one channel by 20dB.
This is a lifesaver in recording situations where your sound source suddenly gets louder and overloads the input of your recording device, causing distortion. This cannot be fixed in post-production and can effectively ruin your recording. Having a second channel recorded at 20dB lower than the main channel – and thus most likely not loud enough to cause distortion – means you will always have a safe backup of your audio.
To find out how to access the safety channel audio, check out this blog post on 'How To Record Two Microphones Into Your Camera', as many of the same principles can be applied.
Fine Gain Control
RØDE Central gives you access to an additional fine gain control. Activating this on the Wireless GO II receiver will expand the three-stage pad to a 10-stage pad, going from 0dB to –30dB in 3dB increments. This allows you to precisely tailor your Wireless GO II’s output to your recording device. It also gives you access to an extra 6dB of gain reduction, which is handy if you have a particularly sensitive recording device.
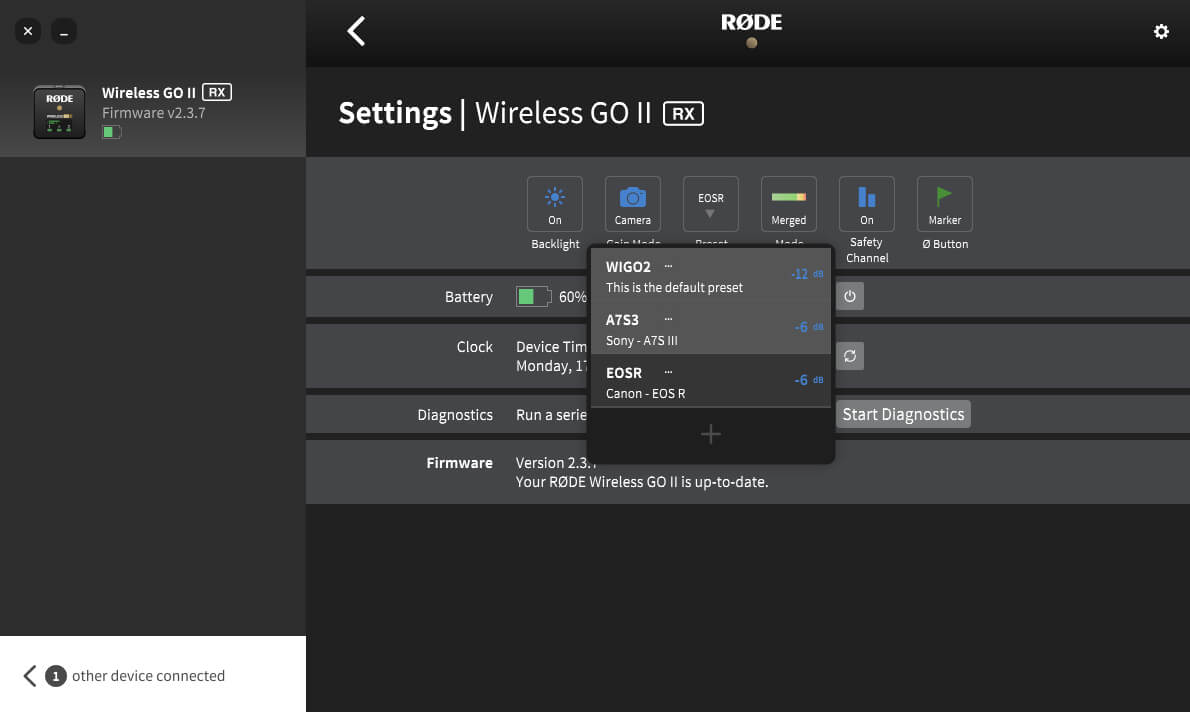
Camera Presets
RØDE Central features a large number of presets based on popular cameras. These presets automatically set the gain levels of your Wireless GO II to best match the audio levels and settings of the camera you’re using it with, and we’ve also created guides to help you set up the audio settings on your camera.
To access these presets, connect your Wireless GO II receiver to your computer and open RØDE Central (desktop). Click ‘Gain Mode’ to cycle through the options until ‘Camera’ is selected. Now you can click ‘Preset’, click the ‘+’ button, and select the manufacturer and model of camera you’re using.
On the next screen, you’ll find a link to a guide on setting up your camera’s audio settings. Once you’ve followed these instructions, click ‘Add’ to load the preset onto your Wireless GO II. Repeat the process to add other presets for any other cameras you’ll be using with your Wireless GO II.
Selecting a Preset on Your Receiver
With your camera presets loaded onto your Wireless GO II, you can cycle through them all by pressing the gain control/mute button on your receiver.
Along with any camera and custom presets you’ve loaded, there will also be a 'WIGO2' option that acts as a default preset. The gain level of this preset can be adjusted within the RØDE Central desktop app by clicking the three dots next to ‘WIGO2’ in the preset list.
You can toggle between camera preset mode, coarse gain mode and fine gain mode in both RØDE Central mobile and desktop apps, so if you’re on the go and want granular control over your Wireless GO II gain level, simply plug the receiver into your phone and use the RØDE Central mobile app to toggle gain modes.
Pro Tip
You can also create your own presets by selecting ‘Custom’ from the list of manufacturers. Here, you’ll be able to give your preset a label (that will show up on your Wireless GO II receiver display), set its gain level, and give it a description for easy selection within RØDE Central.
Low Sensitivity Mode
Sometimes it may be necessary to reduce the sensitivity of the Wireless GO II's in-built microphone or external microphone, so we have included the option to activate a pad for the input of the transmitters.
To activate the pad, simply toggle the 'Pad' button in RØDE Central. You can also activate the pad from the receiver by selecting the transmitter using the pair button (‘∞‘), followed by a long press on the ‘dB’ button.
Note: a short press will activate the mute function, so take care to hold the button until the pad symbol appears on the receiver display.
This feature is particularly useful when using the transmitter with the Interview GO handheld adapter, where it may be used very close to the mouth. The pad function also affects the 3.5mm microphone input if you are using an external lavalier.
LED Brightness
You can reduce the brightness of the LEDs on the transmitter via RØDE Central. Connect the transmitter to your computer and open RØDE Central. Select the transmitter, click the settings cog and toggle the ‘LEDs’ button to switch between 'Bright' and 'Dim' mode.
Transmitter Power (Ø) Button Mode
You can change the function controlled with a short press on the power (‘Ø’) button on the transmitter via RØDE Central. There are four options available: 'Mute', 'Marker', ‘Record’ or 'None'.
In ‘Mute’ mode, a short press of the button will mute the microphone, and another short press will unmute it. The mute status is displayed on the receiver screen (note that the mute function has no effect on the on-board recording when in ‘Always' recording mode).
In ‘Marker’ mode, a short press on the button will drop a marker into the internal recording, which is useful if you need to locate a specific section of audio in post-production.
In ‘Record’ mode, tapping on the transmitter’s Ø button will begin the on-board recording, and another press will end the recording (you’ll also need to select 'Button Mode' from the 'Record' setting to enable this function).
'None' mode deactivates the button.
RØDE Central Mobile
In addition to the desktop version, RØDE Central is also available on iOS and Android devices. This allows for on-the-go device configuration for even greater freedom and flexibility.
RØDE Central Mobile for iOS Devices
Download RØDE Central Mobile via the App Store or the link below. To use RØDE Central Mobile on iOS devices, you will need to update your Wireless GO II firmware.
This cannot be done via the mobile app due to iOS limitations. To update your firmware, download the latest RØDE Central desktop version and plug in your receiver and transmitters.
Note: OS Requirements – iOS 14 or later.
iOSRØDE Central Mobile for Android Devices
Download RØDE Central Mobile via Google Play or the link below.
To use RØDE Central Mobile on Android devices you will first need to update your Wireless GO II firmware. To update your firmware, download the latest RØDE Central desktop version, plug in your receiver and transmitters and follow the prompts.
Note: OS Requirements – Android 9.0 or later.
Android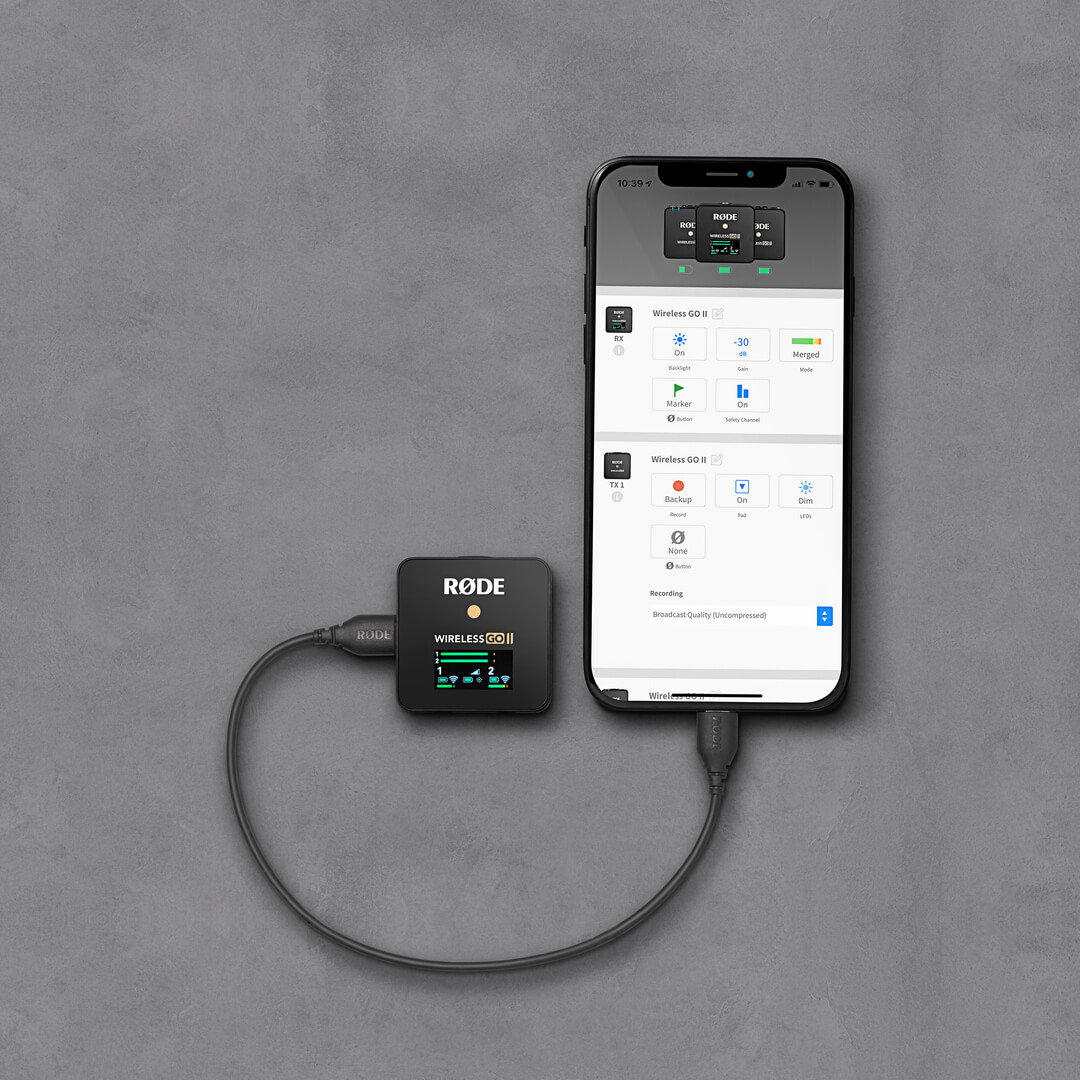
Pro Tip
To connect your Wireless GO II to your Lightning-equipped iOS device, you must use a Lightning to USB-C cable like the RØDE SC15 or SC19.
To connect your Wireless GO II to your Android device (or iPad Pro), you must use a USB-C to USB-C cable like the RØDE SC16 or SC17.
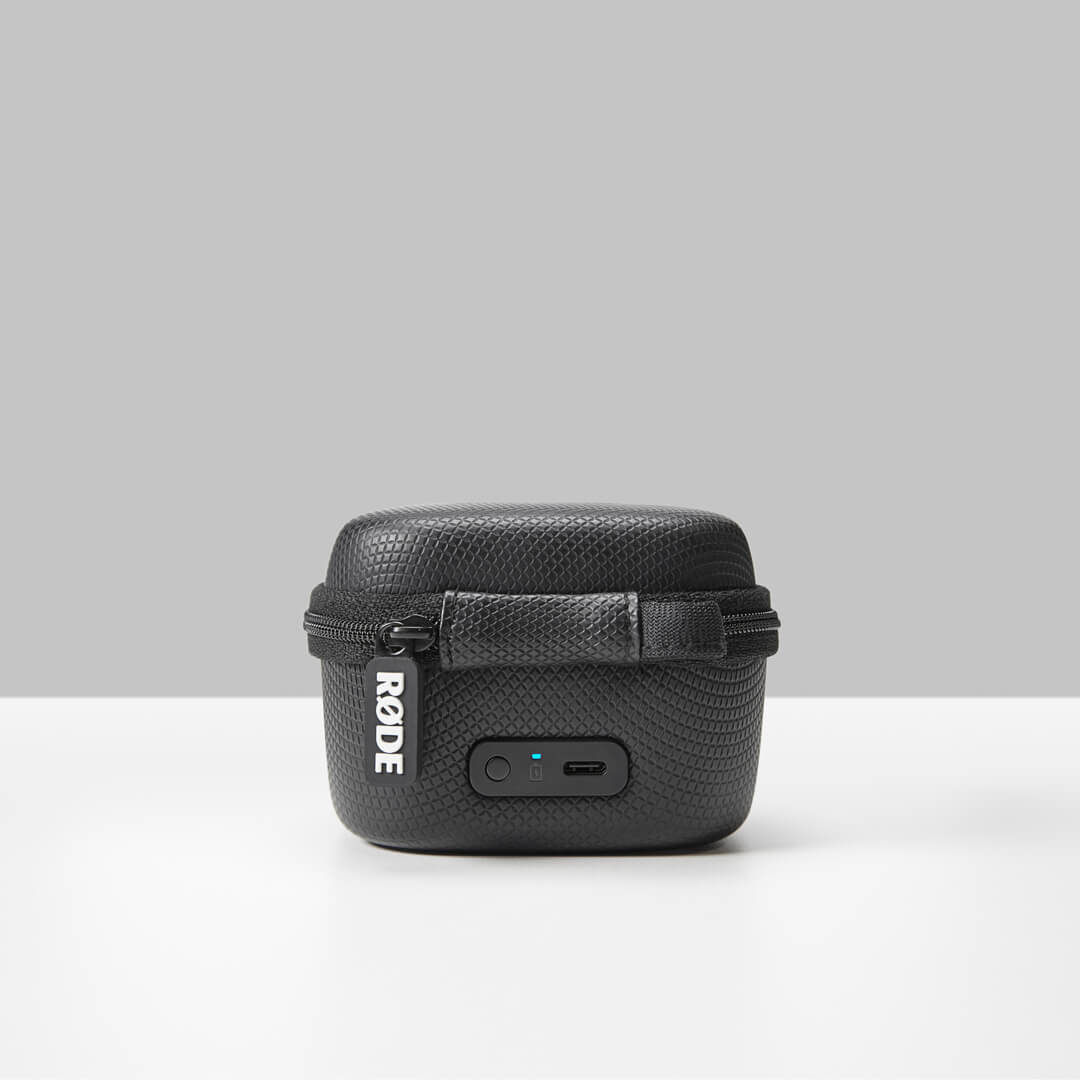
Charge Case for Wireless GO II
The Charge Case for Wireless GO II is an optional accessory that securely stores and recharges your wireless kit on the road or at home. It can top up the receiver and both transmitters with an extra two full charges, giving you up to 21 hours of use in total, and features an innovative zip-up design to ensure your kit is kept safe and secure when not in use.
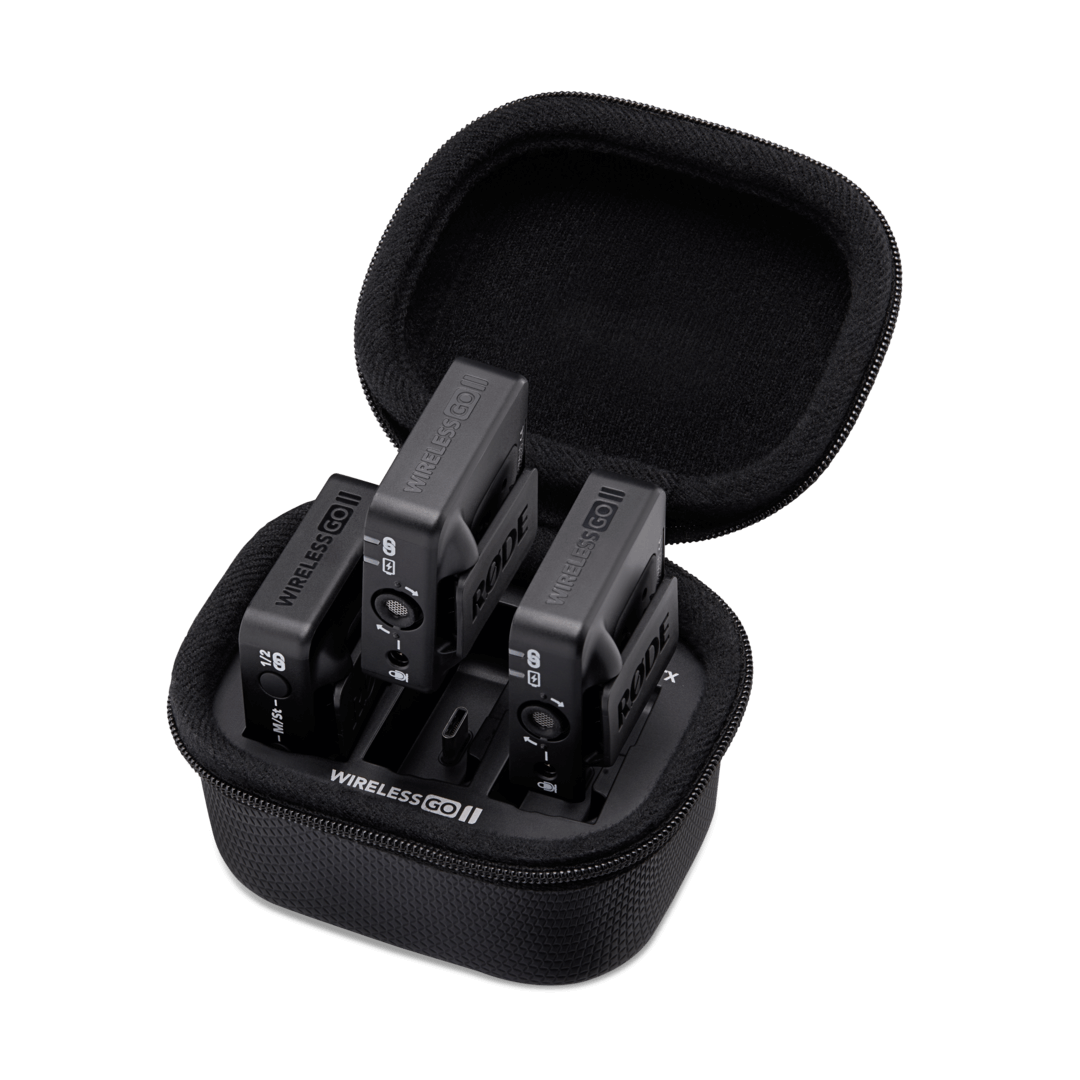
Mounting and Charging Your Wireless GO II in the Charge Case
To charge your Wireless GO II transmitters and receivers, first unzip and open the Charge Case. Next, place each unit in the case with the USB-C port facing down and the flat face of the transmiter or receiver aligned with the flat side of the cavity. Be sure to place the receiver in the slot marked “RX” and the transmitters in the two slots marked “TX” so they fit correctly. Once mounted, your Wireless GO II kit will automatically begin charging if its battery isn’t full.
Charging the Charge Case
To top up the battery in the Charge Case itself, simply connect one of the USB-C cables included with your Wireless GO II to the USB-C port on the Charge Case, and connect the other end to a power source (5V, 3A maximum) such as your computer, laptop or a high-quality USB charger.
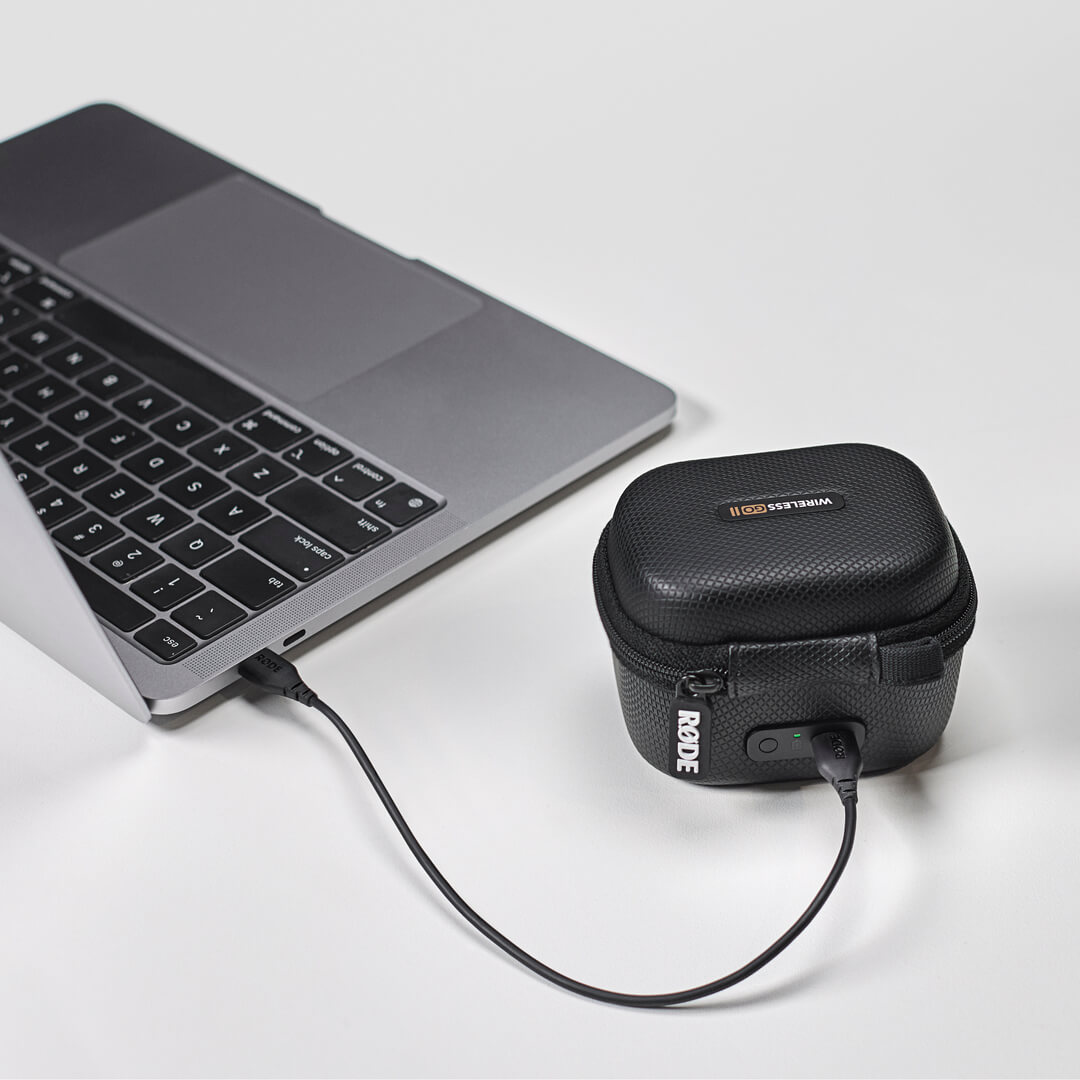
Understanding the Charge Case Status LED
The Charge Case features an indicator LED and a status-check button next to its USB-C port. With your Wireless GO II mounted in the case, the LED will show solid blue while it’s actively charging the transmitters and receiver.
To check the battery level of the Charge Case when it isn’t connected to power, press the status-check button.
- Solid green = healthy charge
- Solid amber = low charge
- Solid red = very low charge
- Flashing red = critical charge
When the Charge Case is connected to power, this LED will display the case’s charging status.
- Solid green = 100% (fully charged)
- Flashing green = 50% - 99%
- Flashing amber = 10% - 50%
- Flashing red = 0% - 10%